NO GALLONS CAN SHIP TO THE FOLLOWING STATES
California, Utah, Arizona, Illinois, Indiana, Ohio, Pennsylvania, New York, Connecticut, Massachusetts, Maine, Rhode Island, Delaware, Maryland, Virginia, New Hampshire, and New Jersey
Please keep in mind when placing your order that only quarts of the gel stain can be sent to the above states. If gallons are purchased we will contact you with cancellation information.
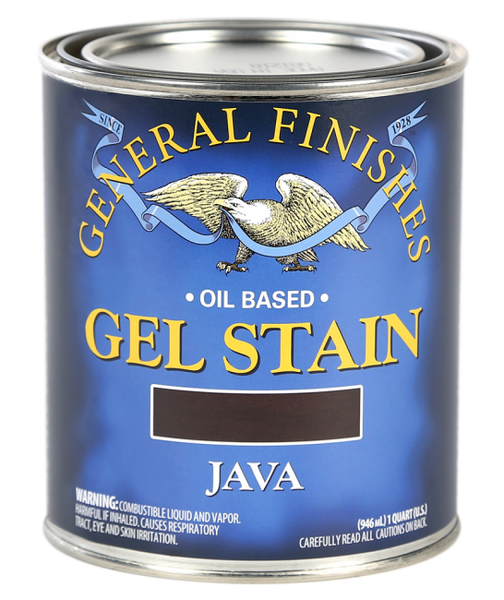
Gel Stain from General Finishes is home of the popular Java Gel Stain featured across the nation's social media for upcycling furniture and cabinets. Gel wood stains are heavy-bodied and do not penetrate as deeply into the wood as liquid oil-based wipe-on stains do, providing the deepest, richest colors of any oil-based stain available.
Please click the below headers to reveal the instructional info for this product.
Step 1: Preparation of Gel Stain
All wood projects require preparation sanding, and all existing finishes require prep cleaning and sanding. If you skip this critical step, your finish may fail.
Preparation for Raw Wood or Raw Wood Projects That Are to be Stained
- Sanding Schedule: 120-grit followed by 150- or 220-grit sandpaper.
- Remove dust with a vacuum, compressed air, an oil-free tack cloth or a water-dampened rag.
- Let dry completely before applying GF product.
- Do not over-sand with fine-grit sandpapers; this will close and seal the wood grain, preventing ideal color absorption.
- Do NOT use steel wool with water-based finishes; the particles will get trapped in the finish and rust.
Preparation for Projects with an Existing Finish (Sealed Surface)
For high-use areas with heavy grime build-up and oil from hands, give your project a deeper cleaning.
- Scuff clean with a Scotch Brite™ pad and a 50:50 mix of denatured alcohol and water. Dry 1-2 hours. Avoid cleaning with products containing phosphates (salt), which can linger in the substrate and produce a white haze. If your project requires a deeper cleaning, see Power Prep Cleaning Highly Used Existing Finishes below.
- Sand lightly with a fine-grade (220-320) foam sanding pad.
- Remove dust with a vacuum, compressed air, an oil-free tack cloth or a water-dampened rag.
- Let dry completely before applying General Finishes product.
Power Prep Cleaning Highly Used Existing Finishes
For high-use areas such as kitchen cabinets or table tops with heavy grime build-up and oil from hands, give your project a "Power" clean.
- Scrub clean with a detergent, such as Spic and Span or Dawn, using a Scotch Brite™ pad.
- Rinse well with water.
- Scrub clean with a Scotch Brite™ pad and a 50:50 mix of denatured alcohol and water. Dry 1-2 hours.
- Sand lightly with a fine-grade (220-320) foam sanding pad.
- Remove dust with a vacuum, compressed air, an oil-free tack cloth or a water-dampened rag.
- Let dry completely before applying General Finishes product.
Alternative Cleaning Solutions For Existing Finishes (Not as aggressive or effective as denatured alcohol; requires rinsing.)
- 50:50 mix of bleach and water
- 50:50 mix of vinegar and water
- Mineral spirits can be used when working with water-based products, but only if the surface is thoroughly rinsed and allowed to dry for 72 hours.
- If you use with products containing phosphates (salt), which can linger in the substrate and produce a white haze, be sure to rinse thoroughly.
Step 2: How To Apply General Finishes Gel Stain
General Finishes Gel Stain Application Steps
- Stir the stain to reincorporate solids that have settled to the bottom of the can.
- Work in a well-ventilated area. Open windows and doors, or use other means to maintain fresh air flow during application and drying.
- If desired, thin stain with mineral spirits. Start by adding 5% by volume and increase up to 15% as needed.
- There is usually no need for General Finishes Pre-Stain Conditioner Natural to improve color uniformity. Gel Stain is loaded with pigments that provide deep uniform coverage.
- Test your complete finishing process before starting. The stain color is affected by variances in wood and deepened with the application of topcoat.
- Surface Preparation is essential. See "Step 1: Preparation for Gel Stain."
- Divide your project into manageable sections: top, side, drawer, door, table seam.
-
Hand-Application over Raw Wood:
- Optional: Apply a slip coat of mineral spirits over the raw wood immediately before application to facilitate the flow of stain on the surface and reduce lap marks. (This is not a conditioner.)
- Working quickly, apply a LIBERAL coat with smooth, even strokes using a natural bristle brush, foam brush, staining pad, pad applicator or foam roller.
- Gel Stain dries quickly for all the reasons customers love it: it is loaded with colorants and solids. If not enough stain is used, the surface may dry too quickly, causing an uneven appearance.
- On large surfaces, leave a wet edge between passes to prevent lap marks. We recommend getting a buddy to help apply the stain.
- Stain one section at a time, leaving a wet edge between sections.
- Wipe off the excess evenly with the grain using high-quality absorbent paper towels, shop towels or open-weave cloths, such as cotton terry towels for larger projects.
- Check for missed spots and lap marks before moving to the next section.
- Do NOT use cotton t-shirts to wipe away stain because they will "push" the stain around and not absorb it.
- Immediately correct lap marks by rewetting the entire working area with stain and wiping off the excess.
- Pull excess stain out of corners and details with a natural bristle brush.
- Let the stain dry 12-24 hours in ideal conditions: 70°F/20°C, 50-70% humidity. Inadequate dry time is one of the top reasons for Gel Stain finish failure. If in doubt, wait longer. Increase dry time if:
- Humidity is over 80%
- 3+ coats are applied (not recommended)
- Thick coats are applied
- Layering General Finishes water- and oil-based products:
- Water over oil: Let oil-based products dry 72+hr before applying water-based products
- Oil over water: Let water-based products dry 24+hr before applying oil-based products
- If Gel Stain is tacky after 5 days, dry time requirements have not been met and it may never dry. The only alternative is to strip off the finish and start over.
- Optional: apply a second coat to deepen the color. Apply no more than 2 coats.
- Finish with 3 coats of General Finishes topcoat, letting each coat dry 72 hours.
-
Dry Brushing Over an Existing Finish
- Finishes dry in two directions: upwards the air side and absorption in raw wood. When finishes are applied over an existing finish, dry times must be increased.
- Prep cleaning and sanding is essential. See "Step 1: Preparation for Gel Stain."
- Test your complete finishing process before starting. The stain color is affected by variances in wood and deepened with the application of topcoat.
- Apply stain with a natural bristle brush or foam brush. Feather out uneven areas and pull excess stain from corners using a bristle brush. Discharge accumulated stain from the brush onto a paper towel soaked with mineral spirits as you work.
- Let the stain dry 72+ hours in ideal conditions: 70°F/20°C, 50-70% humidity. You can tell if an oil-based finish is dry if it is no longer tacky, and cool to the touch. If in doubt, wait longer. Increase dry time if:
- Humidity is over 80%
- 3+ coats are applied
- Thick coats are applied
- Applying over products from other brands
- Layering General Finishes water- and oil-based products:
- Water over oil: Let oil-based products dry 72+hr before applying water-based products
- Oil over water: Let water-based products dry 24+hr before applying oil-based products
- If Gel Stain is tacky after 5 days, dry time requirements have not been met and it may never dry. The only alternative is to strip the finish off and start over.
- Optional: apply a second coat to deepen the color. Apply no more than 2 coats.
- Finish with 3 coats of General Finishes topcoat. See "Step 3: Topcoat Over Oil-Based Stain."
-
Painting on Stain Without Wiping Away (raw wood or existing finish):
- When painting on Gel Stain without wiping away, let the stain dry 72+ hours between coats in ideal conditions: 70°F/20°C; 50-70% humidity.
- Layering General Finishes water- and oil-based products:
- Water over oil: Let oil-based products dry 72+hr before applying water-based products
- Oil over water: Let water-based products dry 24+hr before applying oil-based products
- Tip: If you are using General Finishes Java Gel Stain, General Finishes recommends using General Finishes Dark Chocolate Milk Paint instead of painting on Gel Stain. This Milk Paint color matches a solid application of Java Gel Stain, is much faster to apply, and offers easy water clean up.
Step 3: Topcoat Over Oil Based Stain
Always seal General Finishes oil-based stains with 3 coats topcoat to lock in the color. You can use either oil-based or water-based topcoat. When layering water-based and oil-based products, increase the dry time:
- Water over oil: Let oil-based products dry 72+hrs
- Oil over water: Let water-based products dry 24+hrs
DO NOT use General Finishes Enduro-Var Topcoat with oil-based products.
- Thinner consistency.
- Oil-based.
- Ambers.
- Available in Satin, Semi-Gloss and Gloss sheens.
- Because of its thinner consistency, Arm-R-Seal is easier to apply over large and detailed surfaces, such as kitchen cabinets.
- General Finishes most durable retail topcoat and suitable for high-use areas.
- Thick consistency.
- Oil-based.
- Ambers.
- Available in Satin sheen. This satin is shinier than Arm-R-Seal satin.
- Durable and suitable for high-use areas.
- Looks "white" in the can.
- Drys clear.
- Water cleanup.
- Brush or spray.
- High Performance is very durable and suitable for high-use areas.
- Flat Out Flat is designed to look and feel like a wax finish; it is recommended for low-use projects.
Creative Finishing Techniques Using Gel Stain
Mixing Gel Colors
- Gel stains can be intermixed to create custom colors.
- Gel Stain can be mixed with no more than 10% Liquid Oil Stain is added by volume. The liquid stain will thin the stain, which may help it spread more easily but it will not have as much coverage.
- Gel Stain can be layered over other General Finishes water and oil-based stains. Allow for adequate dry time when layering water and oil products.
Cleanup of Oil Based Products
Cleanup
Clean up application materials and hands with mineral spirits or waterless hand cleaner, like Goop or Gojo.
Disposal
Take great care when disposing of product-soaked applicators. Application materials, such as brushes and towels, containing oil-based products may spontaneously catch fire if improperly discarded. Immediately place all application materials soaked with this product in a sealed, water-filled metal container. Dispose of in accordance with local fire regulations.
Spills
Clean up spills with mineral spirits immediately while wet. If oil-based finishes dry, they are difficult to clean off any surface, clothes or carpet. Carpet may discolor if cleaned with mineral spirits.
Prevention
Protect your workspace with a tarp, your hands with gloves, and your clothes with an apron.
Cleanup of Oil Based Products
Life of Product
General Finishes products do not last forever, even when unopened. They are best used within 1 year of the manufacture date listed on the bottom of the can. The life of the product may be extended with proper care and storage.
Storage Tips
Oil-based products start to harden and cure when exposed to oxygen. The following best practices will increase the life of your product:
-
Pry open sealed lids with a paint can opener by hooking under the lid's rolled edge. The use of a screwdriver can disfigure the rim and lid, impairing a complete seal.
-
Keep lid closed while working. Decant what you will use into a bowl, paper cup, or plate, and close can lid as you work. Every minute the can is open, the product is curing.
-
Clean the chime of the can thoroughly with a paper towel before closing to create a complete seal. Product in the chime can be minimized by using a pouring lid, such as Fitsall. Avoid wiping used brushes on the lid.
-
Pound the lid in place using a rubber mallet to avoid distorting the chime or lid. Dents in the lid from direct contact with a hammer can impair a complete seal. Alternatively, place a flat piece of wood over can lid and firmly pound shut.
-
Store in moderate temperatures. Avoid temperatures below 50°F/10°C or above 80°F/26°C. Keep from freezing. Frozen and heat-damaged product cannot be revitalized. Temperature-controlled spaces, such as a basement, are ideal for storage. Do not store product in an attic, garage, in direct sunlight, or next to an open flame source such as a water heater or furnace.
-
Store can upside down to create a liquid seal, minimizing oxygen exposure from within the can. Decant remaining product from the can before stirring.
-
Add Bloxygen To Sealed Product. Bloxygen is an argon gas system that prevents oxygen and moisture from hardening leftover product. Because Bloxygen gas is heavier than air, it sinks to the surface of the leftover finish, creating a barrier between product and air trapped in the container.
-
Decant leftovers to a smaller container when the finish is almost used up to reduce the volume of oxygen in the container.
Storing Mixtures
- Mixtures involving colors & sheens within the same product line CAN be stored. For example, Java Gel Stain + Brown Mahogany Gel Stain
- Mixtures involving different oil-based products should NOT be stored for later use. For example:
- Gel Stain + Mineral Spirits (for thinning)
- Gel Stain + Liquid Oil-Based Stain
- Gel Stain + Gel Topcoat
Alternative Storage Containers
- Glass Bottles that seal completely.
- Do not store oil-based products in plastic bottles.
Gel Stain hardens faster than other products. It may soften slightly if a small amount of mineral spirits is added.
Supporting Instructional Videos